Wednesday, November 6, 2013

{Crafty Tutorial} Festive Thanksgiving Yarn Wreath

Hey everyone!  I am back today to tell you about what I did with those fun felt flowers that I showed you how to make in yesterday's post.  I have been seeing some very cute yarn wreaths on Pinterest and was itching to try my hand at making one too.  I thought since it was time to take down the Halloween door decorations that I would make a festive Thanksgiving-ish wreath to use for the month of November. 

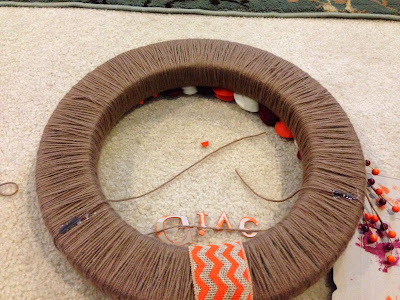
For the first part of this project, I took a foam wreath form that I bought at the craft store and wrapped it with light brown yarn. 

I started by tying a knot on the back of the wreath to keep the yarn in place.  From that point you just start wrapping the yarn around and around.  Please be warned...the wrapping of the yarn takes A LONG TIME!  I had to break it up over a few days because my hands and arms would get tired.  One tip I have for wrapping the yarn is to make a small ball of yarn first so it is easier to pass through the middle of the wreath.  If your ball of yarn runs out just tie a new piece of yarn onto the existing one and keep on wrapping, girl!


 I did two laps of yarn around my wreath to make sure all of the ugly green foam was covered.  Here is a picture of what the wreath will look like when you are done with what seems like it will never end wrapping.


Next, I decided to embellish my wreath using my felt flowers that I made and some fall berries that I picked up at the craft store as well.  I didn't really have any idea of what I wanted to do so I just started laying things out and playing with it until it looked the way that I wanted it to look.


After I had everything the way I wanted it, I took a picture of it and then took all the flowers off so that I could glue on the berries. 


After the berries were glued down, I simply replaced the felt flowers and laid them out like I had them in my picture.  Then, one by one I picked up a flower and hot glued it on.  It went super quick and was very easy.


After you get your flowers glued on and looking good, you can either choose to be done or add a little something more to your wreath.  Should you choose to continue, keep reading!


I thought it would be fun to add some chipboard letters that I painted.


I glued the letters onto two pieces of the same yarn that the wreath was wrapped in.  It was a little bit tricky to get the letters glued on but with a little patience it is possible.  I put a little hot glue on the back of the letter and laid it on top of the yarn and then just pulled it off my scrap board so that it would stick to that as well.   


I then attached my strings of letters onto my wreath by hot gluing them to the back of my wreath.  The finished product turned out pretty well, I think.  I had to try some different things to get it to hang on my front door but I was able to figure something out.


Anyone else working on something Thanksgiving-ish for their front door?  Hopefully, you will be inspired to try a yarn wreath someday, even though it is time consuming, just stick with it and you will be very happy with the end result! 

Tuesday, November 5, 2013

(Crafty Tutorial) No-Sew Cutesy Felt Flowers

Has anyone else been wanting to learn how to make those cute felt flowers that can be seen on headbands, wreaths, embellishments on frames, etc.?  I never thought it could be so easy and simple!  So I am here today to show you how to make these very cute flowers.  They don't involve any sewing at all, which is great for me, considering 1) I don't really know how to sew and 2) I don't own a sewing machine!  I hope you enjoy this quick and easy tutorial!


You will need a few things to make these flowers:

  • A few sheets of felt (any color you would like, one sheet can make about 4 or 5 flowers depending on how big you want them; I bought my felt sheets at Hobby Lobby where they were 4 for $1.)
  • Scissors 
  • A marker or pen 
  • A CD or something round to trace 
  • Hot glue gun 
  • Optional: Buttons or gems for embellishment

The first thing to do is to place the CD on the felt and trace around the outside of it. 


Then cut out the circle along the line that you traced.


Then starting anywhere on the outside of the circle, make a cut and continue cutting towards the middle of the circle.  This process reminds me of how you would cut out a snake when you were little.  It is hard to explain but the picture should help.

You will continue to cut towards the middle until you have a small circle left.  You need to keep this small circle at the end to glue onto the bottom of your flower, but more on that in a minute.  Your felt circle should look like the picture below when done cutting.


Next, you will begin from where you first started cutting and roll the felt in your fingers.  You will continue rolling the felt up until you get to the small circle that you left at the end. 


Next, you will put a small dab of hot glue in the middle of the bottom of the flower, under that small circle flap and then press the flap down. 


Then, your flower should be complete and ready for whatever project you will use them for!


You may choose to add an embellishment to the center of your flower as well.  I had some colorful buttons lying around and used a few for my flowers.


If you are wondering what I am going to do with my felt flowers, stay tuned for tomorrow's post!! I am working on a fun wreath project using these cutesy felt flowers!  I also plan on making some of these flowers to use for headbands since they were so, so EASY! Anyone else make any no-sew flowers lately?? They are uber-easy!

Monday, November 4, 2013

{Family Project} Make your own Thankful Tree

Hello again!  I'm back today folks with a cute and simple family project!  I hope everyone had a safe and happy Halloween!  We had a ton of trick-or-treaters at our house that night and it was so fun to hand out candy and see all the creative costumes.  And now that Halloween is over, it is on to the next holiday season...THANKSGIVING!  I absolutely love Thanksgiving, more specifically for the turkey dinner at my parents' house, but also for the time to reflect on giving thanks for all that we have.  I was inspired by many people on Facebook who have recently begun posting reasons why they are thankful each day for the month of November.  While I love social media and appreciate people sharing their reasons on Facebook, I thought it would be fun to do a family project and create a thankful tree together with my husband. 

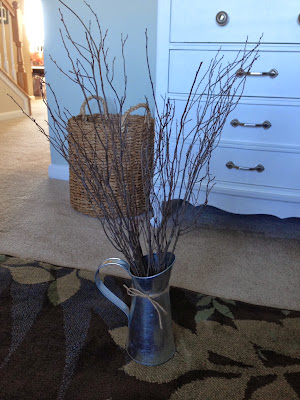
So on my weekend trip to Hobby Lobby, I picked up some skinny tree branches that were 50% off ($3.99) to help create our tree.  I used a simple, silver can that I had for a "vase" for my branches. 
To start, I removed the plastic wrap from my branches and started to arrange them in the can.  I probably should have bought two packages of branches to make it a bit more fuller but I still think it turned out fine. 

 Once my branches were arranged how I wanted them, I gathered up some scrapbook scraps that I had lying around that I thought were "Thanksgiving-ish" colors.  My plan was to use my circle punch to punch out some circles to use as the "leaves" for our tree.
I punched out three or four circles of each patterned paper because the idea is to add a "leaf" each day of November with something that you are thankful for written on each one.  My husband and I are each planning to do one each day.  When I was done I had about 50 or so circles ready for all that wonderful thankfulness!
After I had punched out all my circles, I went back and put a small hole punch at the top of each one so that they could easily be hung on my tree branches.  I was able to punch like four or five at a time so it went pretty fast.  Once the holes were punched, we wrote some reasons why were thankful and simply slipped the branch through the small hole and let it hang.  Voila!
I thought our thankful tree would make a great dining room table centerpiece so that is where I headed with my finished tree, complete with a few thankful leaves for the first few days of November.  My husband was very sweet and said he was thankful for his "wonderful wife" on the first day!  What a guy!  We plan to continue adding "leaves" each day to our tree and are enjoying being able to reflect about all that we are grateful for this holiday season.

 Oh..I also put the extra "leaves" and some markers to write with in a cute little leaf dish I had lying around from my fall decor.  That way it is easy to grab a circle, write on it, and hang it on the tree each day. 

I hope you enjoyed our fun family project!  I would love to continue this as a tradition when we have little ones running around one day.  And while we don't spend Thanksgiving at our house, we might have to take our little thankful tree to my parents' house so they can add to it on the days we are there as well!  Hear that mom...make room for my tree somewhere!! :)

Anyone else trying to reflect this November?  Trying the 30 days of Thankfulness?  Anyone else making a tree?